Tampilkan postingan dengan label video. Tampilkan semua postingan

Kamis, 04 Desember 2008

Installing LiVES

Another good video editor out there is called LiVES. I wanted to test out the latest version so I went to GetDeb for the download. The website getdeb.net is maintained by a volunteer group that makes fresh .deb packages featuring some of the most used software in Ubuntu. Sometimes the Ubuntu repos can get behind and not have the latest and greatest, so this website is a great companion when you need or want to have the latest version of certain software. So here are the steps:
  1. Download the .deb file from getdeb.net.
  2. Double-click on the file to start up the GDebi package installer.
  3. First it will tell you that you should install the one in the official channel. Nevermind the message because you are installing the latest.
  4. The package installer will most likely tell you that it needs to download some other packages for dependencies.
  5. Click on Install package and when the installer finishes you can find LiVES under Applications>Sound & Video

Selasa, 02 Desember 2008

Installing Cinelerra

Recently I have needed to do some video editing and wanted to check out some of the best video editors for Linux. It looked like Cinelerra had the best options but it was not clear how to install it easily. I did not want to install from source so after some careful searching around I found the easy way. You can also view these instructions here (I made some additions as they did not work for me as they were written).
  1. Install a repository using this link. After you download the package make sure you install it with the GDebi package installer.
  2. Open a terminal and type this command: sudo apt-get update
  3. Now decide which package you need; cinelerra (x86 and x86_64 without opengl 2.0 video card) cinelerra-generic (x86 and x86_64 with opengl 2.0 video card). You can see the other versions on the page I mentioned earlier under the installation instructions for Hardy
  4. Install your package using apt-get: sudo apt-get install cinelerra-generic
  5. Once installation completes you should be able to find Cinelerra under Applications>Sound & Video.
So far I found the program quite useful and powerful. There are some good articles out there about using it to author DVDs if you do a quick search. One of the articles I read was on linux.com and it was quite helpful to give me a good start on using Cinelerra for editing video. You can find that article here.

Dual Monitors with Nvidia GeForce 8600 GT

Once you install the restricted hardware drivers and you have your Nvidia card working you can then proceed to set up dual monitors. Open up System>Administration>Nvidia X Server Settings. This will open up a dialog box like so...
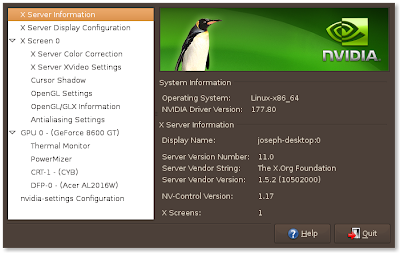
This nice GUI will allow us to set up our dual monitor interface. I will say that the program can be quite fickle at times and sometimes it will not work even though it should work. Just keep trying with the options until you get a working combination. I wanted my second monitor, which happens to be a regular 15" CRT, to simply be an extension of my desktop. This is done using the TwinView configuration option as seen in the next photo.
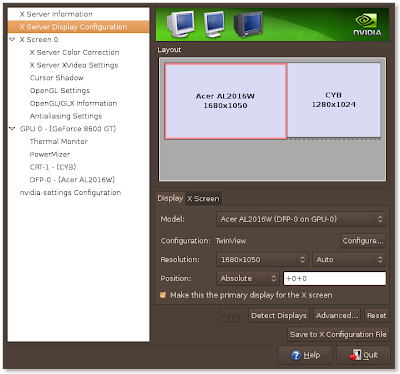
And the options for my second monitor...
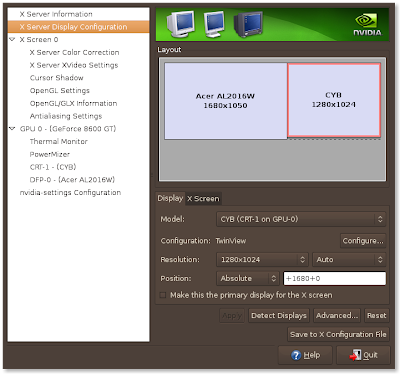
Once you get the right settings made make sure you click the Save to X Configuration File. If you don't click that then next time you start up all of your custom settings will be gone and you will have to play around with it again.

Setting up the dual monitors was fairly quick for me. Took approx. 10 minutess of playing with various settings to get it to display just like I wanted it too. If you have an Nvidia card you should be able to set these up without too much hassle using similar options like I did. Of course if you want to do a separate X screen you could choose that as well instead of the TwinView.
 
support by: infomediaku.com